Managing BDD testing with PractiTest
With more and more companies shifting from waterfall to Agile or Agile-like approaches testingand quality has become a more integral element in all phases of the project and not just at the end of it.
One of the oldest and better known premises of QA is that it is easier to develop a product right using a quality driven approach than by fixing all the bugs at the end, and here is where approaches such as BDD come into play.
Behavior-driven development or BDD, which was first written by Dan North, is a method for a more accessible and effective way for teams new to agile software delivery that aims at testing human behavior rather than a computer function.
The approach, using the basic concepts of “given, when, then” to describe various user scenarios, offers an improved communication method between product owners, developers, testers and users with or without a tool. A common usage of this approach is with automation using Gherkin and combining it with unit testing.
Managing your BDD requirements using PractiTest will allow you to get end-to-end coverage for your user stories, starting from requirements, connecting them to relevant tests and runs, reporting issues in case such arises and reporting results via real time updating dashboards.
Combining manual, automation and exploratory testing within PractiTest will enable you to get a comprehensive picture of your testing status and ensure that you are providing your stakeholders the right information at the right time to make smarter project and product decisions.
What BDD tests look like in PractiTest?
Creating user stories –
Because BDD testing is based on user stories, it is best to start in PractiTest Requirements’ module, where you can create and manage all your project requirements. [see more on how to create Requirements]
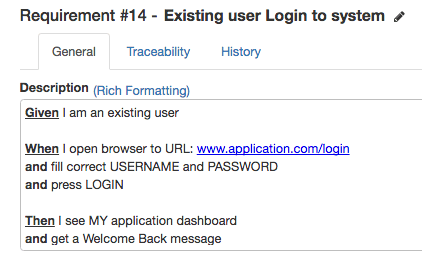
Your requirement for any scenario should be written in BDD common phrasing: “Given – When – Then”. In this example we display a simple “Login” scenario with a full description in BDD format –
Creating and Running Tests –
The next step is to create a test for the requirement. To create a related test, go to the Traceabilityin the new Requirement and create a new test for the requirement (notice that it is possible to connect the requirement with an existing test from the test library as well). The new Test created will be linked to the requirement throughout PractiTest, which will make tracking the user story status clear, simple and reportable. The new Test just created will have the same title and full description as it’s originating Requirement.
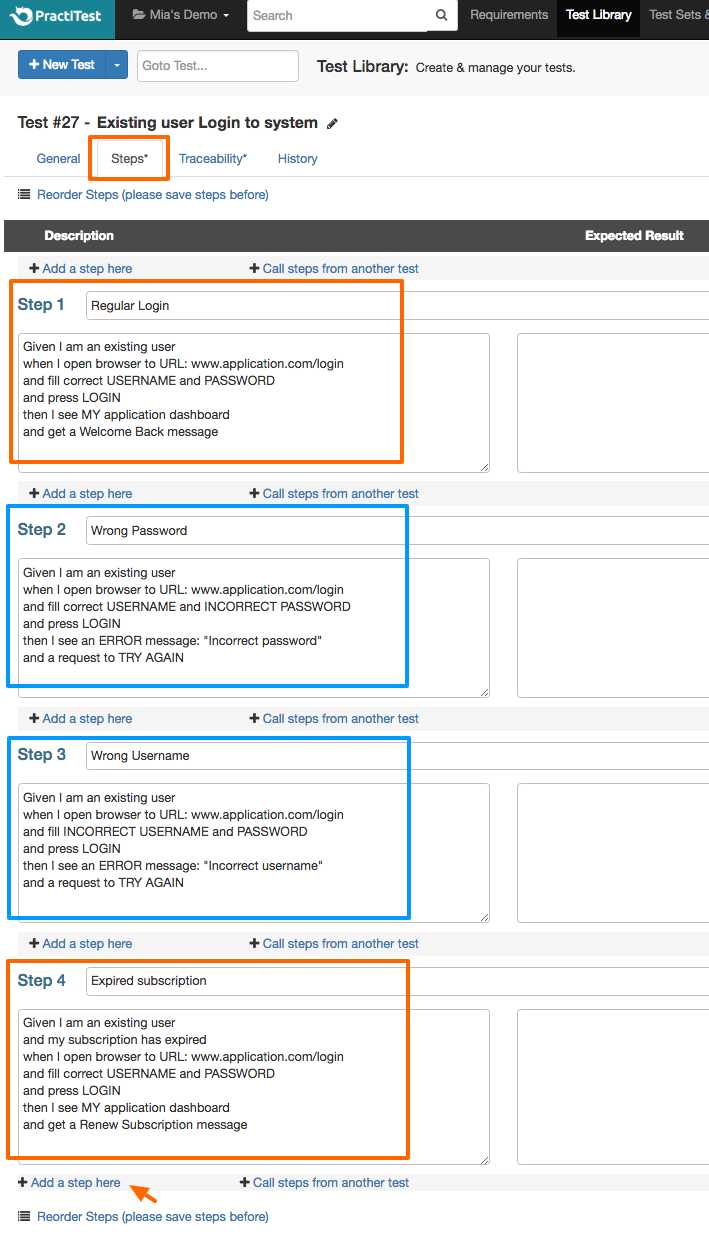
The next phase is to add the test steps.
When testing using BDD methodology with PractiTest, it is best to define the first step “STEP 1” as your “sunny day scenario” – your primary scenario to be tested. And then you can subsequently use the following steps (2, 3, 4, etc.) to test alternative scenarios based on the primary scenario. Be sure to mention the title of the scenario, and full expected results. Be sure to SAVE CHANGES.
Once the test is ready add it to an existing Test Run (of course a new Test Run can be created as well). And proceed to Run.
In the Test Instance window, mark the Pass/Fail etc. for each step. In this example the last step on my test, scenario 4 has failed. I can update the actual results description for further handling and documentation. The status of my Test can also be seen in the Test Library as well. (Note: with PractiTest, if any one step is marked as “Fail” the entire test status will be flagged as “Failed”)

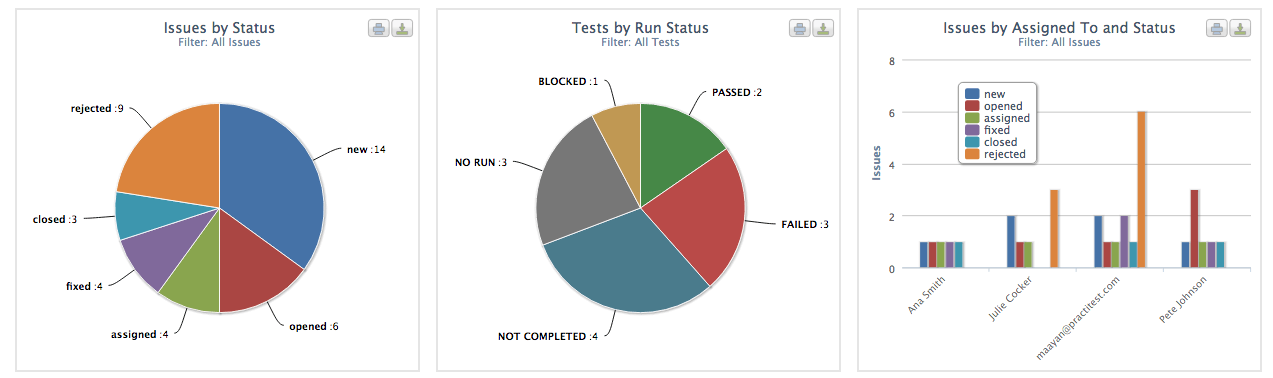
Exporting and Viewing Results –
The Test results can be exported in the Reports section and you can also create a useful Dashboard representation of your BDD Testing Results.
[Read more about PractiTest Dashboards]
https://www.practitest.com/qa-learningcenter/best-practices/bdd-testing/